Now that the sourdough starter recipe is finalized, I can conquer all the sourdough bread recipes I’ve been dreaming about for years.
The first on the list is Tartine Bakery’s Basic Country Bread.
Before I share that adventure (and what an adventure it was), I wanted to summarize the sourdough starter recipe in a single post and answer a very important question every beginner will eventually ask: How do I maintain a sourdough starter?

HOW TO MAINTAIN A SOURDOUGH STARTER
Above is how my sourdough starter looked like on day 10. Once you obtain a starter that is behaving predictably – meaning it doubles in volume in 8-12 hours after each feeding – the next step is to maintain that vitality.
Keeping the starter at room temperature
If you intend to bake frequently, you’ll be better off keeping your sourdough starter at room temperature. In that case, you’ll have to feed the starter every 12 hours. A ratio of 1 part starter to 5 parts flour and 5 parts water (by weight) is a good starting point. The sourdough starter will need more food (flour & water) when it’s warmer. Just keep an eye on its behavior between feedings – if it starts to fall earlier than before, adjust the amount of flour and water accordingly.
Keeping the starter in the refrigerator
I’ve come across too many different feeding schedules and haven’t had the time to test them all, so I’ll summarize what I’m doing at the moment. If I ever discover a better way (and by all means, please do share if you know a better way in the comments section), I’ll make sure to update this section. I’m keeping my sourdough starter in the refrigerator and feeding it every 3-4 days. I bake once or twice a week, so I place two tablespoons of sourdough starter in a separate container, feed it with 125 grams of flour and 125 grams of water and keep at room temperature for 12 hours before I use it as my leaven. I discard all but a tablespoon of the rest of the starter and feed it with 100 grams of flour and 100 grams of water, cover the lid and keep it in the refrigerator. This schedule has been working great for the past couple of weeks.
Keeping the leaven in the freezer
In one of his forum posts, Dan Lepard says: “… if you can freeze a dough leaven as soon as the fermentation has peaked it will bounce back to a useable ‘life’ quicker than reviving a liquid one stored in the fridge.” His full method is on the Times website here (you have to subscribe to see the article). I haven’t tried this method yet, but the next time I try a recipe, I’ll reserve a small piece and place it in the freezer to see what will happen.
And here’s how my sourdough starter developed since day one, with a recipe below, detailing the feeding schedule.
DAY 1

Learning how to make a sourdough starter and maintaining it as long as I can is at the top of my to-do list this year.
It takes a lot of time and patience – both of which I’d like to reserve for the book I’m working on – to master the art of sourdough bread, but I just can’t get the bread I ate at Tartine Bakery out of my mind.
Actually, aside from a daily routine of feeding the starter, there’s not much else to do. It will take 7-10 days to grow the culture, so the first step is to mix 5 pounds of flour, which you’ll be using to feed the culture. I will be following Chad Robertson’s recipe in “Tartine Bread”, so I’m using half bread and half whole wheat flour.


The blue one on the left is bread flour and the yellow one next to it is whole wheat.
All you need to do in day 1 is to mix flour and water, cover with a clean cloth and set aside to start the sourdough process.

Long live the microorganisms!
DAY 2

This must be the least exciting day of the sourdough adventure. It has been 24 hours since I started making my own sourdough starter.
There’s a light crust on top. It didn’t rise a bit and smells nothing like stinky cheese.
I can see signs of life around the edges. The book mentions bubble formation happening after 2-3 days. Is my sourdough starter maturing faster than expected?
I’m not sure. I guess it will be safer to wait for another day to see if it’s ready for the first feeding.
DAY 3

Quite exciting compared to yesterday! The volume of the sourdough starter increased by almost an inch. It is very bubbly and a dark crust has formed over the top.
Smells like stinky cheese. Actually, the smell is so strong that I can’t go anywhere near it.
This means the culture is very ripe. It is time to do the first feeding.

I pull the crust back (with my nose closed), discard 80% of it, add flour & water, wipe the rim clean and put the cloth back on.

DAY 4

24 hours have passed since the first feeding. Looking at the mark it left, I can see that the sourdough starter rose and fell during the night.
In addition to that, I see that there’s a bit of water trapped in the middle. See the thin line?
Still smells like stinky cheese. More bubbles when compared to previous days.

The batter isn’t as thick as yesterday so I decide to decrease the amount of water.
Again with my nose closed, I discard 80% of it, add flour & water, wipe the rim clean and put the cloth back on.
DAY 5

Same as yesterday. The sourdough starter dried out on top, but it doesn’t look like a crust.
The rise isn’t significant. Still smells acidic, but not as strong as days 3 and 4.
The starter is much thicker today, so I decide to keep the water ratio low.

I discard 80% of it, add flour & water, wipe the rim clean and put the cloth back on.

I also decide to tie a string around the glass bowl to watch the rise & fall closer. The photo above was taken 2 hours 45 minutes after the feeding. It rose by approximately quarter of an inch.
DAY 6

Yesterday, the sourdough starter rose by approximately quarter of an inch after the feeding. Looking at it today, I see that it didn’t rise much after that.
The crust is a bit darker and drier. I peel the crust and it’s bubbly underneath.
The stinky cheese smell is almost gone. It started smelling like fresh milk.

I was expecting a bit more rise, so I decided to up the feed but keep the water/flour ratio same.
I discard 80% of it, add flour & water, wipe the rim clean and put the cloth back on.
DAY 7

Yet another uneventful day. The sourdough starter looks pretty much the same as yesterday.
The starter has to ferment predictably (rising and falling after each feeding) before preparing the leaven.
Needless to say, this much of rise is not enough.
I discard 80% of it, add flour & water, wipe the rim clean and put the cloth back on.
DAY 8

Look at that! Very exciting. There’s quite a significant rise today.
The sourdough starter rose by approximately an inch and a half.
If I get a similar result tomorrow, I’ll bake my first sourdough bread.


DAY 9

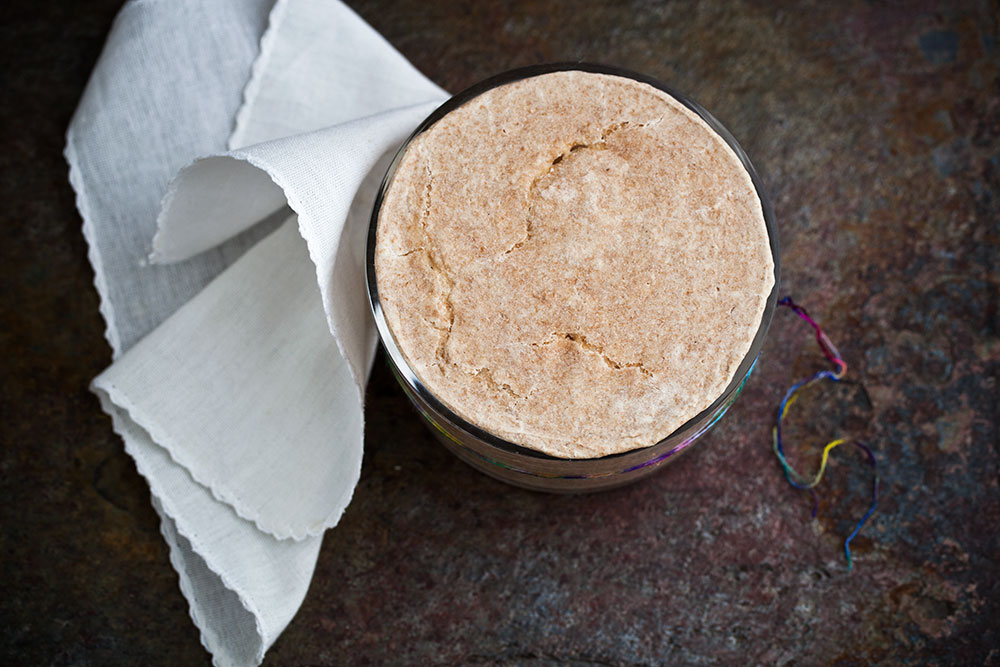
The sourdough starter is ready at last! Remember how it rose yesterday? Looks like it rose almost twice as much after the last feeding.
The napkin on top kept it from overflowing… Almost. A teaspoon of it has found its way, but the rest is fine.
Now it’s time to bake some bread.
Tartine’s Basic Country Bread is at the top of my list. Any other suggestions? Is there a sourdough recipe you just can not live without?
Let me know!
SOURDOUGH STARTER RECIPE
Yield: 1 cup
Recipe adapted from “Tartine Bread” by Chad Robertson
DAY 1
Ingredients
- 140 grams (1 cup) bread and whole wheat flour (%50-%50) blend
- 140 grams (approximately 1/2 cup + 1 tablespoon) lukewarm water
Method
- Mix flour and water in an impeccably clean glass bowl with a wooden spoon until no lumps remain. Wipe the rim clean, cover with a clean cloth and place in the warmest spot in your kitchen.
DAY 2
Method
- Keep the sourdough starter at room temperature without feeding it.
DAY 3
Ingredients
- 125 grams (3/4 cup + 2 tablespoons) bread and whole wheat flour (%50-%50) blend
- 125 grams (1/2 cup + 1 teaspoon) lukewarm water
Method
- Remove crust and discard 80% of the sourdough starter. Add flour and water and mix until no lumps remain. Wipe the rim clean, cover with a clean cloth and place in a cool spot in your kitchen.
DAY 4
Ingredients
- 125 grams (3/4 cup + 2 tablespoons) bread and whole wheat flour (%50-%50) blend
- 100 grams (approximately 1/3 cup + 1 tablespoon) lukewarm water
Method
- Remove crust and discard 80% of the sourdough starter. Add flour and water and mix until no lumps remain. Wipe the rim clean, cover with a clean cloth and place in a cool spot in your kitchen.
DAY 5
Ingredients
- 125 grams (3/4 cup + 2 tablespoons) bread and whole wheat flour (%50-%50) blend
- 100 grams (approximately 1/3 cup + 1 tablespoon) lukewarm water
Method
- Remove crust and discard 80% of the sourdough starter. Add flour and water and mix until no lumps remain. Wipe the rim clean, cover with a clean cloth and place in a cool spot in your kitchen.
DAY 6
Ingredients
- 150 grams (approximately 1 cup + 1 tablespoon) bread and whole wheat flour (%50-%50) blend
- 125 grams (1/2 cup + 1 teaspoon) lukewarm water
Method
- Remove crust and discard 80% of the sourdough starter. Add flour and water and mix until no lumps remain. Wipe the rim clean, cover with a clean cloth and place in a cool spot in your kitchen.
DAY 7
Ingredients
- 150 grams (approximately 1 cup + 1 tablespoon) bread and whole wheat flour (%50-%50) blend
- 125 grams (1/2 cup + 1 teaspoon) lukewarm water
Method
- Remove crust and discard 80% of the sourdough starter. Add flour and water and mix until no lumps remain. Wipe the rim clean, cover with a clean cloth and place in a cool spot in your kitchen.
DAY 8
Ingredients
- 150 grams (approximately 1 cup + 1 tablespoon) bread and whole wheat flour (%50-%50) blend
- 125 grams (1/2 cup + 1 teaspoon) lukewarm water
Method
- Remove crust and discard 80% of the sourdough starter. Add flour and water and mix until no lumps remain. Wipe the rim clean, cover with a clean cloth and place in a cool spot in your kitchen.
DAY 9
Ingredients
- 125 grams (3/4 cup + 2 tablespoons) bread and whole wheat flour (%50-%50) blend
- 100 grams (approximately 1/3 cup + 1 tablespoon) lukewarm water
Method
- Remove crust and discard 80% of the sourdough starter. Add flour and water and mix until no lumps remain. Wipe the rim clean, cover with a clean cloth and place in a cool spot in your kitchen.
MAINTENANCE
Ingredients
- 100 grams (2/3 cup + 2 teaspoons) bread and whole wheat flour (%50-%50) blend
- 100 grams (approximately 1/3 cup + 1 tablespoon) lukewarm water
Method
- If your sourdough starter rises & falls predictably, it is ready for use. You may keep it in the refrigerator and feed it every 3-4 days, or at room temperature, feeding it every 12 hours according to the plan above. If your sourdough starter isn’t as ripe on day 9, give it a couple more days to ripen – feeding it every 24 hours at room temperature according to the plan on day 9.
- Discard all but a tablespoon of your sourdough starter. Add flour and water and mix until no lumps remain. Wipe the rim clean, cover and place either at room temperature (feeding it every 12 hours) or in the refrigerator (feeding it every 3-4 days).


Thank goodness you are back. We had visions of it taking over at night while you slept!
Cenk I have a question that perhaps you can answer. I want to make a few of David Lebowitz’s cakes from his new book but some of them call for mild flavored molasses. I live in Istanbul, so molasses isn’t available. Do you think that pekmez, dut or otherwise would be a good substitute? Or should I order molasses from the USA?
Judy – No need to order from the USA. Üzüm and dut pekmezi are both good substitutes.
I love this post! I had a major fail when I had a little oops in feeding. I’m going to try again. I like the fridge idea because I only need to bake bread a couple of times a week just for the two of us.
Thank you Cenk for the advice on the molasses substitute. I was sure that you would know the answer. Do you have a restaurant in Istanbul or are any of your wonderful desserts served or sold somewhere in town?
Judy – You’re welcome. Sorry, my desserts are only available online 🙂
I have thoroughly enjoyed watching your excitement and joy on this culinary adventure!
Above all – thank you so much for this coverage. I’ve meant to make the same sourdough since ever but your posts really motivated me to start with it. Are you sure, that the starter has to be fed every four days for maintenaince? That would be quite tiresome for me.
Bridget from the way the cookie crumbles suggest every two weeks.
http://www.crumblycookie.net/2011/05/29/tartine-country-bread/
Best regards from Berlin, Su
Su – I’ve heard of once a week, but not two.
Dear Cenk,
Congratulations on your fantastic blog and thank you for this starter advenure.
I was wondering if you know how I can make a gluten-free natural starter.
Many thanks for your help.
All good thoughts from Portugal
Maria Teresa Jorge – I don’t know how to make it gluten-free, sorry.
How much, by volume, is 100 grams of starter?
joann freedman – A bit less than 1/2 cup.